Protocol Buffer 会将对象序列化为二进制数据。在本文中,我们简单了解下它是如何对数据进行编码的,即:了解下底层的编码格式。当然并非必须的,日常使用 Protocol Buffer 不需要精通这些细节。不过,对于想要进行性能优化的人来说,理解底层格式会很有帮助。
Free Hex Editor Neo:https://freehexeditorneo.com/
1. 准备数据
在项目中创建 encode.proto 文件:
syntax = "proto3";


message MyVarint
{
  int32 num1 = 1;
  int64 num2 = 2;
  bool num3 = 3;
}


message MyFixed
{
  fixed32 num1 = 1;
  fixed64 num2 = 2;
}


message MyLen
{
  string num1 = 1;
}


message MyCustom
{
  repeated int32 num1 = 1;
  map<int32, string> num2 = 2;
}
编译生成 C++ 操作接口,并编写如下代码生成二进制编码文件:
#if 1

#define _CRT_SECURE_NO_WARNINGS
#include<iostream>
#include<fstream>
using namespace std;

#include "encode.pb.h"

void test01()
{
	MyVarint data;
	data.set_num1(214748);
	data.set_num2(20);
	data.set_num3(true);

	ofstream ofs("my-varint.bin", ios::binary);
	data.SerializeToOstream(&ofs);
	ofs.close();
}

void test02()
{
	MyFixed data;
	data.set_num1(10);
	data.set_num2(20);

	ofstream ofs("my-fixed.bin", ios::binary);
	data.SerializeToOstream(&ofs);
	ofs.close();
}

void test03()
{
	MyLen data;
	data.set_num1("abc");

	ofstream ofs("my-len.bin", ios::binary);
	data.SerializeToOstream(&ofs);
	ofs.close();
}

void test04()
{
	MyCustom data;
	data.add_num1(10);
	data.add_num1(20);

	data.mutable_num2()->insert({1, "aaa"});
	data.mutable_num2()->insert({2, "bbbb"});

	ofstream ofs("my-custom.bin", ios::binary);
	data.SerializeToOstream(&ofs);
	ofs.close();
}


int main()
{
	test01();
	test02();
	test03();
	test04();

	return EXIT_SUCCESS;
}
#endif
2. 编码探究
message 中的每一个字段都会使用一个字节来进行标识:
- 前 3 个二进制位表示编码类型
- 后 5 个二进制位表示字段编号

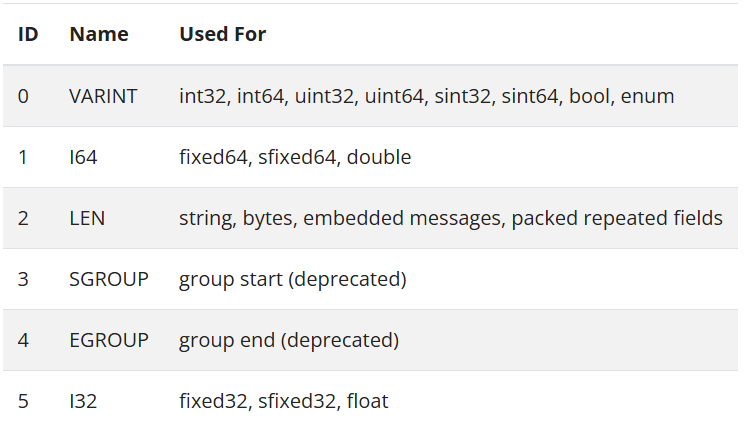
不同的字段类型对应着不同的编码方式,下表展示了不同的类型与编码方式的对应关系:

接下来,我们将会探讨不同的存储方式。
2.1 VARINT
VARINT 使用可变字节数来存储整数,具体使用多少个字节取决于整数的大小。小的整数会占用更少的字节,而大的整数则需要更多的字节。
syntax = "proto3";

message MyVarint
{
  int32 num1 = 1;
  int64 num2 = 2;
  bool num3 = 3;
}
假设我们实例化的对象:
num1: 214748
num2: 20
num3: true
序列化之后的二进制数据:
# num1 编码
00001000 11011100 10001101 00001101
# num2 编码
00010000 00010100
# num3 编码
00011000 00000001
2.2 I64 和 I32
I32 和 I64 是用于表示整数的数据类型。它们分别代表 32 位和 64 位有符号整数。这些数据使用 4 和 8 字节进行数据存储。
syntax = "proto3";

message MyFixed
{
  fixed32 num1 = 1;
  fixed64 num2 = 2;
}
假设我们实例化的对象:
num1: 10
num2: 20
序列化之后的二进制数据:
# num1 编码
00001101 00001010 00000000 00000000 00000000
# num2 编码
00010001 00010100 00000000 00000000 00000000 00000000 00000000 00000000 00000000
2.3 LEN
在序列化时,首先编码数据的长度,然后是实际的数据。
syntax = "proto3";

message MyLen
{
  string num1 = 1;
}
假设我们实例化的对象:
num1: "abc"
序列化之后的二进制数据:
# num1 编码
00001010 00000011 01100001 01100010 01100011
2.4 复杂类型
使用长度+数据的方式进行存储。
syntax = "proto3";

message MyCustom
{
  repeated int32 num1 = 1;
  map<int32, string> num2 = 2;
}
假设我们实例化的对象:
num1: 10
num1: 20

num2 {
  key: 2
  value: "bbbb"
}

num2 {
  key: 1
  value: "aaa"
}
序列化之后的二进制数据:
# num1 编码
00001010 00000010 00001010 00010100
# num2 {2, "bbbb"} 编码
00010010 00001000 00001000 00000010 00010010 00000100 01100010 01100010 01100010 01100010
# num2 {1, "aaa"} 编码
00010010 00000111 00001000 00000001 00010010 00000011 01100001 01100001 01100001
至此,我们能够大概了解 Proto Buffer 是如何进行数据序列化。


 冀公网安备13050302001966号