
face_recognition 是一个基于 dlib 库的人脸识别工具包。主要包括:
- 标注人脸位置
- 计算人脸特征
- 人脸信息编码
- 人脸信息匹配
该 Python 工具包使用起来也比较简单,我们就通过几个例子来了解下使用方法。也可以直接参考文档,下联链接已经给出:
Document: https://face-recognition.readthedocs.io/en/latest/readme.html
1. Face Recognition 安装
安装要求:
- Python 3.3+ or Python 2.7
- macOS or Linux (Windows not officially supported, but might work)
pip install face_recognition
详细按照文档:https://face-recognition.readthedocs.io/en/latest/readme.html#requirements
2. 标注人脸位置
人脸识别使用的接口为:
face_locations(img, number_of_times_to_upsample=1, model="hog")
- img 为要进行人脸检测的输入图像
- number_of_times_to_upsample 在进行人脸检测时,
face_locations函数使用了一个基于 HOG 特征的人脸检测算法。这种算法对于输入的图像分辨率有一定的要求,因为低分辨率的图像往往难以检测出人脸。为了解决这个问题face_locations函数会先对输入图像进行上采样,提高其分辨率,然后再进行人脸检测。具体来说,它表示对输入图像进行几次上采样。每次上采样都会使图像的分辨率翻倍,因此上采样的次数越多,图像的分辨率就越高,人脸检测的精度也会相应提高。但是,上采样次数越多,计算时间也会相应增加。因此,在设置这个参数时需要根据实际需求进行平衡。 - model 使用何种人脸检测模型,可选的值有:hog 和 cnn,hog 的准确率低一些,但是更快。cnn 是深度模型,有着更好的准确率,但是检测速度要慢一些,使用时,可能需要 GPU 加速模型计算以便能够获得更好的实时性能
- 返回值:该函数将会返回一个列表,列表中的每个元素都是一个包含了 4 个位置值 (top, right, bottom, left) 的元组,用于表示人脸的位置
接下来,我们使用该 API 检测下面输入图像中的人脸位置,下面是示例代码(test03 为 cv2 中的检测器示例):

import face_recognition
import matplotlib.pyplot as plt
import cv2
import time


# 获得人脸坐标
def test01():

    # 1. 读取要识别的图像
    image = face_recognition.load_image_file('1.jpg', mode='RGB')
    print('图片尺寸:', image.shape)

    # 2. 使用 hog 检测人脸位置
    start = time.time()
    face_locations = face_recognition.face_locations(image, model='hog')
    print('HOG 检测时间:', time.time() - start)

    # 3. 绘制人脸位置
    for top, right, bottom, left in face_locations:
        cv2.rectangle(image, (left, top), (right, bottom), color=(255, 0, 255), thickness=2)
        plt.title('HOG')
        plt.imshow(image)
    plt.show()


def test02():

    # 1. 读取要识别的图像
    image = face_recognition.load_image_file('1.jpg', mode='RGB')
    print('图片尺寸:', image.shape)

    # 2. 使用 cnn 检测人脸位置
    start = time.time()
    face_locations = face_recognition.face_locations(image, model='cnn')
    print('CNN 检测时间:', time.time() - start)

    # 3. 绘制人脸位置
    for top, right, bottom, left in face_locations:
        cv2.rectangle(image, (left, top), (right, bottom), color=(255, 0, 255), thickness=2)
        plt.title('CNN')
        plt.imshow(image)
    plt.show()


def test03():
    # 1. 读取要识别的图像
    image = cv2.imread('1.jpg', cv2.IMREAD_COLOR)
    print('图片尺寸:', image.shape)

    # 2. 使用 cv2 检测人脸位置
    model = cv2.CascadeClassifier('haarcascade_frontalface_alt2.xml')
    # 检测之前先将图像转换为灰度图
    gray_image = cv2.cvtColor(image, cv2.COLOR_BGR2GRAY)
    start = time.time()
    # 返回: x, y, width, height
    face_locations = model.detectMultiScale(gray_image)
    print('CV2 检测时间:', time.time() - start)

    # 3. 绘制人脸位置
    image = cv2.cvtColor(image, cv2.COLOR_BGR2RGB)
    for x, y, width, height in face_locations:
        cv2.rectangle(image, (x, y), (x + width, y + height), color=(255, 0, 255), thickness=2)
        plt.title('CV2')
        plt.imshow(image)
    plt.show()


if __name__ == '__main__':
    test01()
    test02()
    test03()
程序输出结果:
图片尺寸: (432, 658, 3)
HOG 检测时间: 0.11088299751281738
图片尺寸: (432, 658, 3)
CNN 检测时间: 2.421550750732422
图片尺寸: (432, 658, 3)
CV2 检测时间: 0.06716680526733398

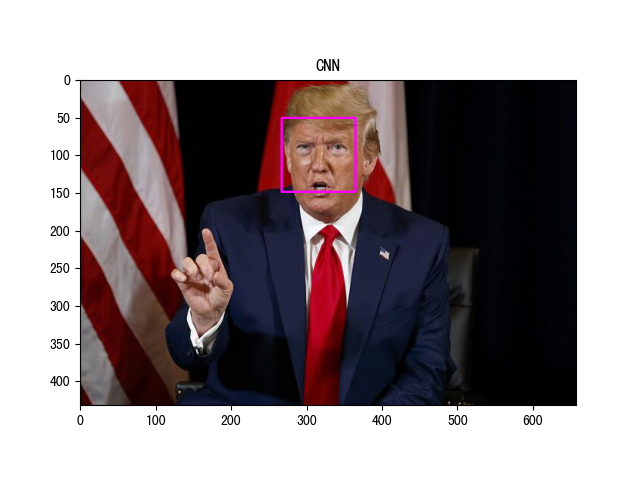

上述输出的检测时间都是在 CPU 上的计算结果。
3. 计算人脸特征
人脸特征即提取下巴(chin)、左眉(left_eyebrow)、右眉(right_eyebrow)、鼻梁(nose_bridge)、鼻尖(nose_tip)、左眼(left_eye)、右眼(right_eye)、上唇(top_lip)、下唇(bottom_lip)共计 72 个关键位置特征。
如果将 face_landmarks 函数的 model 参数设置为 small,则只输出鼻尖(nose_tip)、左眼(left_eye)、右眼(right_eye)这三个部位共计 5 位置特征
import face_recognition
import matplotlib.pyplot as plt


def test():

    image = face_recognition.load_image_file('1.jpg', mode='RGB')

    # [(51, 365, 149, 267)]  => top, right, bottom, left
    face_locations = face_recognition.face_locations(image, model='hog')

    # 获得人脸特征
    facial_features = face_recognition.face_landmarks(image, face_locations, model='large')
    print(facial_features)

    # 绘制人脸特征
    for facial_feature in facial_features:
        for key, features in facial_feature.items():
            for feature in features:
                cv2.circle(image, feature, radius=2, color=(0, 255, 12))

    plt.imshow(image)
    plt.show()


if __name__ == '__main__':
    test()
程序输出结果:
[{'chin': [(278, 92), (278, 104), (279, 117), (281, 130), (284, 142), (290, 154), (298, 164), (306, 173), (318, 175), (332, 173), (344, 165), (355, 156), (365, 146), (371, 133), (374, 119), (375, 105), (376, 91)], 'left_eyebrow': [(283, 85), (289, 79), (297, 79), (305, 81), (313, 84)], 'right_eyebrow': [(323, 83), (332, 80), (342, 78), (352, 80), (359, 86)], 'nose_bridge': [(318, 91), (318, 99), (317, 108), (316, 117)], 'nose_tip': [(309, 122), (313, 124), (317, 125), (322, 124), (327, 123)], 'left_eye': [(292, 90), (296, 87), (302, 87), (307, 91), (302, 92), (296, 92)], 'right_eye': [(333, 91), (338, 88), (344, 88), (349, 91), (344, 93), (338, 93)], 'top_lip': [(306, 143), (309, 138), (313, 135), (317, 137), (322, 136), (328, 139), (333, 144), (330, 144), (322, 141), (317, 141), (314, 141), (309, 143)], 'bottom_lip': [(333, 144), (328, 151), (322, 154), (318, 154), (313, 153), (309, 149), (306, 143), (309, 143), (313, 144), (317, 145), (322, 144), (330, 144)]}]

4. 人脸信息编码
我们在做人脸匹配时,比较的就是两个人脸的编码距离。face_encodings 函数如下:
face_encodings(face_image, known_face_locations=None, num_jitters=1, model="small")
- face_image 输入的检测图像
- known_face_locations 为 face_locations 函数检测到的多个人脸位置
- model 可选的值为 large、small,表示用多少个人脸特征来构造人脸编码,small 更快
- num_jitters 它指定了在提取人脸特征时进行多少次随机扰动(jitter),随机扰动指的是将输入的人脸图像进行随机的微小变换,例如旋转、裁剪、亮度变换等,从而生成多个略微不同的人脸图像。在进行人脸特征提取时,将这些略微不同的图像进行特征提取,并将得到的特征向量进行平均或取中位数,可以提高人脸识别的精度,但计算时间也会相应增加。
示例代码:
import face_recognition
import matplotlib.pyplot as plt


def test():
    # 读取输入图像
    image = face_recognition.load_image_file('1.jpg', mode='RGB')
    # 计算人脸位置
    face_locations = face_recognition.face_locations(image, model='hog')
    # 人脸信息编码
    face_encodings = face_recognition.face_encodings(image, known_face_locations=face_locations, model='large')
    print('人脸编码维度:', face_encodings[0].shape)
    print(face_encodings)

if __name__ == '__main__':
    test()
程序输出结果:
人脸编码维度: (128,)
[array([-0.10339236,  0.14851965,  0.01029977,  0.00930228, -0.15734453,
        0.03904981,  0.01654922, -0.17565952,  0.05527157, -0.12608829,
        0.18594478, -0.07738445, -0.31720433, -0.09317419,  0.0242323 ,
        0.17734227, -0.1299797 , -0.1051617 , -0.21656519, -0.10200764,
        0.00980881,  0.06125376, -0.03489925, -0.02904189, -0.12794323,
       -0.25462753, -0.08247674, -0.03054573,  0.02245354, -0.04793654,
        0.04205053,  0.01841517, -0.23550904, -0.06501944, -0.02505583,
        0.02860026, -0.05353981, -0.06184244,  0.13586399,  0.03928199,
       -0.13611943,  0.04089652,  0.01368326,  0.23697728,  0.18460381,
       -0.00639988,  0.02225903, -0.09905794,  0.11359482, -0.24700806,
       -0.0144341 ,  0.12040581,  0.11725815,  0.08271284,  0.03133506,
       -0.08889135,  0.04660001,  0.13280977, -0.147306  ,  0.07945663,
        0.09690579, -0.18537416, -0.06320523, -0.06023312,  0.12699956,
        0.0395139 , -0.02118635, -0.13156748,  0.19904432, -0.14599995,
       -0.11009898,  0.00675882, -0.07475307, -0.13796815, -0.39703727,
        0.03987332,  0.40932226,  0.17702992, -0.2292663 , -0.04161827,
       -0.04523409,  0.02514784,  0.1070801 ,  0.06148657, -0.04007861,
       -0.12225512, -0.12017394,  0.07339939,  0.25885367, -0.10757827,
       -0.00895133,  0.28658509,  0.07006181, -0.04103569,  0.03035998,
        0.00265448, -0.0738667 , -0.06689832, -0.03737948, -0.01301235,
        0.1173306 , -0.16319954,  0.03531633,  0.11514346, -0.14696895,
        0.20176159, -0.02319317,  0.00985028,  0.01496939, -0.05379927,
       -0.08210421,  0.02171123,  0.19380003, -0.15109025,  0.20256151,
        0.20543517, -0.08692768,  0.09492791,  0.07402149,  0.1480388 ,
       -0.07978582,  0.00954351, -0.15085556, -0.18490645,  0.05490613,
        0.00381539,  0.02888954,  0.05953676])]
5. 人脸信息匹配
人脸信息匹配其实就是将两个人脸的编码计算欧式距离,距离越大则越不相似,我们实际在比较两个人脸相似度时,就需要设置一个判断阈值。
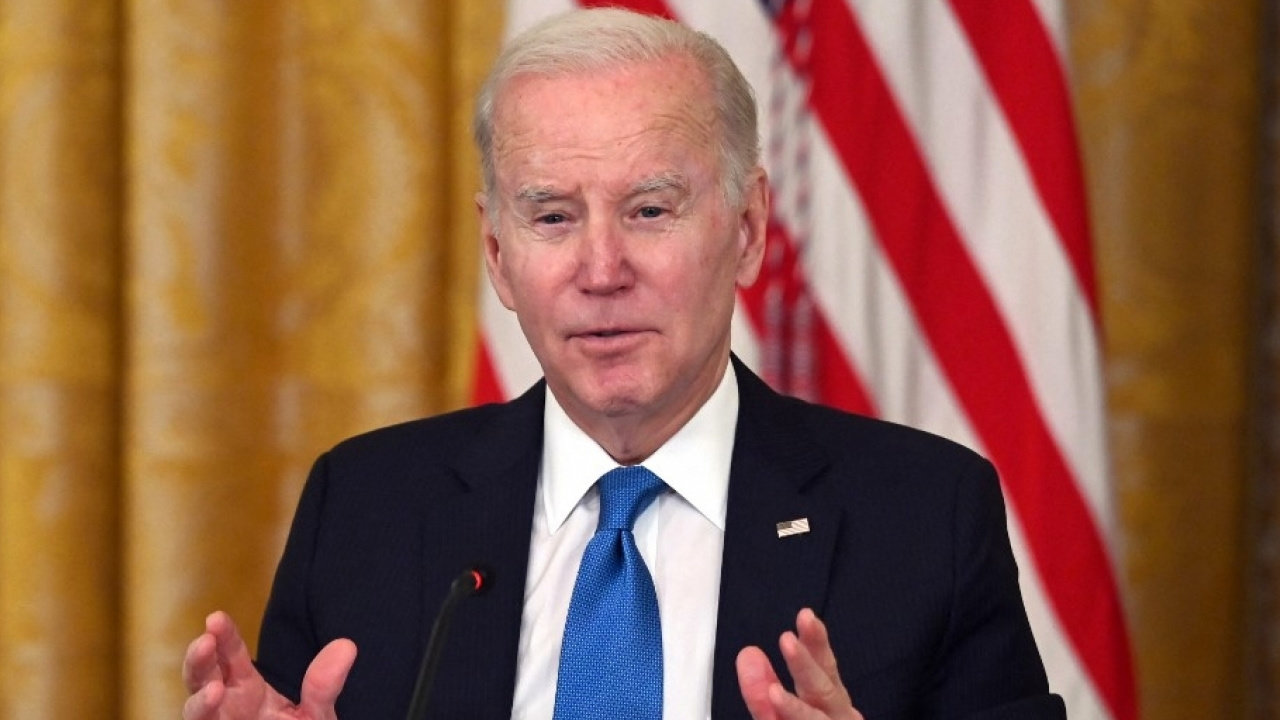
我们接下来从下面两张图片中提取人脸编码信息,并比较是否是同一个人。
示例代码:
import face_recognition
import matplotlib.pyplot as plt

def test():

    # 读取输入图像
    trump = face_recognition.load_image_file('1.jpg', mode='RGB')
    biden = face_recognition.load_image_file('2.jpeg', mode='RGB')

    # 识别人脸位置
    trump_locations = face_recognition.face_locations(trump, model='hog')
    biden_locations = face_recognition.face_locations(biden, model='hog')

    # 绘制提取人脸
    top, right, bottom, left = trump_locations[0]
    plt.subplot(121)
    plt.title('Trump')
    plt.imshow(trump[top: bottom, left: right])

    top, right, bottom, left = biden_locations[0]
    plt.subplot(122)
    plt.title('Biden')
    plt.imshow(biden[top: bottom, left: right])
    plt.show()

    # 人脸信息编码
    trump_encodings = face_recognition.face_encodings(trump, trump_locations)
    biden_encodings = face_recognition.face_encodings(biden, biden_locations)

    # 计算人脸相似度
    similarity = face_recognition.face_distance(trump_encodings, biden_encodings[0])
    print('人脸相似度:', similarity)  # 值越大越不相似

    # 比较人脸编码
    # tolerance 为阈值,两个人脸编码的欧式距离小于该值认为相似,默认为 0.6, 值越大越严格
    # 第一个参数为一个人脸编码列表
    # 第二个参数为单个人脸编码数值
    result = face_recognition.compare_faces(trump_encodings, biden_encodings[0], tolerance=0.3)
    print(result)


if __name__ == '__main__':
    test()
程序执行结果:
人脸相似度: [0.62457377]
[False]

 冀公网安备13050302001966号