


Fun-CosyVoice3-0.5B-2512 是阿里巴巴通义语音团队推出的开源文本转语音(TTS)模型,具备多语言、多方言合成、情感控制、音色克隆等实用功能,且部署门槛低,非常适合初学者上手。本教程将围绕最基础的环境搭建、核心功能使用及简单应用,带大家快速掌握模型的基本用法。
- 硬件要求:建议 GPU 显存 ≥ 12GB,无 GPU 环境可使用 CPU 推理,但速度较慢。
- 依赖工具:确保已安装 Git(用于克隆代码和下载模型)、Anaconda/Miniconda(用于创建独立环境)。
1. 模型使用
1.1 模型加载
创建项目以及需要的环境:
# ====================== 操作步骤 ======================
# 1. 使用 conda 创建虚拟环境 cosyvoice-env
# 2. 在 PyCharm 中创建 "TTS服务器" 项目,并配置环境为 cosyvoice-env
# 3. 在 "TTS服务器" 项目目录中,下载模型 Fun-CosyVoice3-0.5B-2512 以及模型开发包 CosyVoice
# 4. 进入 CosyVoice 目录,安装其依赖的包
# =====================================================


# ====================== 相关命令和链接 ======================
# 模型链接:https://huggingface.co/FunAudioLLM/Fun-CosyVoice3-0.5B-2512

# 下载开发包
git clone --recursive https://github.com/FunAudioLLM/CosyVoice.git
# 下载模型
git clone https://www.modelscope.cn/FunAudioLLM/Fun-CosyVoice3-0.5B-2512.git

# 创建虚拟环境,并安装开发包相关依赖
conda create -n cosyvoice-env python=3.10
conda activate cosyvoice-env
pip install -r requirements.txt -i https://mirrors.aliyun.com/pypi/simple/ --trusted-host=mirrors.aliyun.com
在项目中创建 demo.py 文件,在该文件中编写模型使用相关代码。模型加载需要使用目录 CosyVoice/cosyvoice/cli/cosyvoice 下的 CosyVoice3 类,为了能够正确导入该类,需要将两个目录增加到包搜索路径:
import sys
sys.path.append('CosyVoice')
sys.path.append('CosyVoice/third_party/Matcha-TTS')
接下来,使用下面代码就可以正确加载模型:
from cosyvoice.cli.cosyvoice import CosyVoice3

# model_dir: 模型路径,必须
# load_trt=False: 是否使用 TensorRT 推理框架,我们场景简单,不使用
# load_vllm=False: 是否使用 vllm 推理框架,我们场景简单,不使用
# fp16=False: 是否在推理时,使用自动混合精度,有助于提高推理速度,使用
cosyvoice = CosyVoice3(model_dir='Fun-CosyVoice3-0.5B-2512', fp16=True)
1.2 模型推理
CosyVoice3 模型提供了三种不同的推理函数,分别是:
- inference_zero_shot:参考音频的全部声学特征,追求原声复刻。例如:音色、语速、口音细节
- inference_cross_lingual:只迁移参考音频的音色,保持目标语言自然度
- inference_instruct2:用指令控制语音风格,可结合参考音色。例如:语速、情感、方言等
import sys
sys.path.append('CosyVoice')
sys.path.append('CosyVoice/third_party/Matcha-TTS')

from cosyvoice.cli.cosyvoice import CosyVoice3
import torchaudio

cosyvoice = CosyVoice3(model_dir='Fun-CosyVoice3-0.5B-2512', fp16=True)

# 1. inference_zero_shot
def demo01():
    prompt_text = 'You are a helpful assistant.<|endofprompt|>Maintaining your ability to learn translates into increased marketability, improved career options and higher salaries.'
    prompt_wav = 'audio/spk-3.wav'
    tts_text = 'The device would work during the day as well, if you took steps to either block direct sunlightor point it away from the sun.'

    generator = cosyvoice.inference_zero_shot(tts_text=tts_text, prompt_text=prompt_text, prompt_wav=prompt_wav)
    for chunk in generator:
        torchaudio.save('demo/demo01-1.wav', chunk['tts_speech'], cosyvoice.sample_rate)

    tts_text = '空山新雨后,天气晚来秋。明月松间照,清泉石上流。竹喧归浣女,莲动下渔舟。随意春芳歇,王孙自可留。'
    generator = cosyvoice.inference_zero_shot(tts_text=tts_text, prompt_text=prompt_text, prompt_wav=prompt_wav)
    for chunk in generator:
        torchaudio.save(f'demo/demo01-2.wav', chunk['tts_speech'], cosyvoice.sample_rate)


# 2. inference_cross_lingual
def demo02():
    prompt_wav = 'audio/spk-3.wav'
    tts_text = 'You are a helpful assistant.<|endofprompt|>The device would work during the day as well, if you took steps to either block direct sunlightor point it away from the sun.'
    generator = cosyvoice.inference_cross_lingual(tts_text=tts_text, prompt_wav=prompt_wav)
    for chunk in generator:
        torchaudio.save('demo/demo02-1.wav', chunk['tts_speech'], cosyvoice.sample_rate)

    tts_text = 'You are a helpful assistant.<|endofprompt|>空山新雨后,天气晚来秋。明月松间照,清泉石上流。竹喧归浣女,莲动下渔舟。随意春芳歇,王孙自可留。'
    generator = cosyvoice.inference_cross_lingual(tts_text=tts_text, prompt_wav=prompt_wav)
    for chunk in generator:
        torchaudio.save(f'demo/demo02-2.wav', chunk['tts_speech'], cosyvoice.sample_rate)

    # 注意:inference_cross_lingual 适合短文本
    # 由于 inference_cross_lingual 要求输入的 tts_text 前面加上 You are a helpful assistant.<|endofprompt|>,
    # 但是加上之后,长文本就不会自动切分,会把长文本一次性扔给模型,由于输入文本太长,模型生成的语音会存在发音不准确,有噪声,不完整的问题
    # 如果不加 You are a helpful assistant.<|endofprompt|>,会生成多段语音,每段语音的语速、发音可能存在较大差异


# 3. inference_instruct2
def demo03():
    prompt_wav = 'audio/spk-1.wav'

    # =========== 1. 方言 ===========
    tts_text = '那座古老的城堡笼罩在神秘的雾气中,吸引着冒险者前去探索。'
    instruct_text = 'You are a helpful assistant. 请用粤语表达,并用合适的语速。<|endofprompt|>'
    generator = cosyvoice.inference_instruct2(tts_text=tts_text, instruct_text=instruct_text, prompt_wav=prompt_wav)
    torchaudio.save('demo/demo03-1.wav', next(generator)['tts_speech'], cosyvoice.sample_rate)

    # =========== 2. 语速 ===========
    tts_text = '那座古老的城堡笼罩在神秘的雾气中,吸引着冒险者前去探索。'
    instruct_text = 'You are a helpful assistant. 请用尽可能快的语速。<|endofprompt|>'
    generator = cosyvoice.inference_instruct2(tts_text=tts_text, instruct_text=instruct_text, prompt_wav=prompt_wav)
    torchaudio.save('demo/demo03-2.wav', next(generator)['tts_speech'], cosyvoice.sample_rate)

    # =========== 2. 情绪 ===========
    tts_text = '这里一片荒凉,没有水,也没有生机,孤独感和无助让我心如刀割。'
    instruct_text = 'You are a helpful assistant. 请使用愤怒的情绪。<|endofprompt|>'
    generator = cosyvoice.inference_instruct2(tts_text=tts_text, instruct_text=instruct_text, prompt_wav=prompt_wav)
    torchaudio.save('demo/demo03-3.wav', next(generator)['tts_speech'], cosyvoice.sample_rate)


# 4. 参考视频预处理
def demo04():
    print('可用音色:', cosyvoice.list_available_spks())

    prompt_text = 'You are a helpful assistant.<|endofprompt|>如果你对某件事情有强烈的感觉,你应该发声并采取行动。这是我生活的哲学。'
    prompt_wav = 'audio/spk-1.wav'
    cosyvoice.add_zero_shot_spk(prompt_text=prompt_text, prompt_wav=prompt_wav, zero_shot_spk_id='zh-spk')

    prompt_text = 'You are a helpful assistant.<|endofprompt|>Maintaining your ability to learn translates into increased marketability, improved career optionsand higher salaries.'
    prompt_wav = 'audio/spk-3.wav'
    cosyvoice.add_zero_shot_spk(prompt_text=prompt_text, prompt_wav=prompt_wav, zero_shot_spk_id='en-spk')

    # 保存参考音频信息
    cosyvoice.save_spkinfo()

    tts_text = '空山新雨后,天气晚来秋。明月松间照,清泉石上流。竹喧归浣女,莲动下渔舟。随意春芳歇,王孙自可留。'
    generator = cosyvoice.inference_zero_shot(tts_text=tts_text, prompt_text='', prompt_wav='', zero_shot_spk_id='zh-spk')
    for chunk in generator:
        torchaudio.save(f'demo/demo04.wav', chunk['tts_speech'], cosyvoice.sample_rate)

    # 注意:inference_zero_shot、inference_instruct2 虽然有 zero_shot_spk_id 参数,但是实现逻辑有 BUG, 长文本时会报错


if __name__ == '__main__':
    demo01()
    demo02()
    demo03()
    demo04()
2. 应用案例
2.1 服务端
将模型部署为服务,会用到 FastAPI 和 Uvicorn 两个工具:
- FastAPI:一款轻量、高效的 Python Web 框架,专门用于构建 API 服务。它能快速将模型推理功能封装为可调用的接口,上手难度低,适合初学者用于简单服务部署。
- Uvicorn:一款高性能的 Web 服务器,用于运行 FastAPI 应用。它负责接收客户端的请求并转发给 FastAPI 处理,是 FastAPI 应用部署的常用配套工具,启动简单且占用资源少。
# 禁止输出 DEBU 级别的日志
import logging
logging.disable(logging.DEBUG)

# 设置 onnxruntime 日志输出级别最高
import onnxruntime
onnxruntime.set_default_logger_severity(4)

# 禁止输出所有警告
import warnings
warnings.filterwarnings('ignore')

# 全局禁用所有 tqdm 进度条
import os
os.environ['TQDM_DISABLE'] = '1'

import sys
sys.path.append('CosyVoice')
sys.path.append('CosyVoice/third_party/Matcha-TTS')
from cosyvoice.cli.cosyvoice import CosyVoice3

from fastapi import FastAPI
from fastapi import Form
from fastapi.responses import StreamingResponse
from fastapi.responses import JSONResponse

import numpy as np
import uvicorn
import time
import json
import glob

app = FastAPI()

# 加载模型
cosyvoice = CosyVoice3(model_dir='Fun-CosyVoice3-0.5B-2512', fp16=True)

# 添加音色
speakers = json.load(open('audio/speakers.json'))
prefix = 'You are a helpful assistant.<|endofprompt|>'
available_speakers = []
for speaker in speakers:
    cosyvoice.add_zero_shot_spk(prefix + speaker['txt'], f'audio/{speaker["wav"]}', zero_shot_spk_id=speaker['sid'])
    available_speakers.append({'name': speaker['name'], 'sid': speaker['sid']})

def text_to_speech(txt, spk):
    generator = cosyvoice.inference_zero_shot(txt, '', '', zero_shot_spk_id=spk)
    for chunk in generator:
        chunk = chunk['tts_speech'].numpy().squeeze()
        yield chunk.tobytes()

@app.post('/tts')
def get_audio(txt: str = Form(...), spk: str = Form(...)):
    return StreamingResponse(content=text_to_speech(txt, spk))

@app.get('/spk')
def get_speaker_list():
    return JSONResponse(content=available_speakers)

if __name__ == '__main__':
    uvicorn.run('server:app', host='0.0.0.0', port=8000)
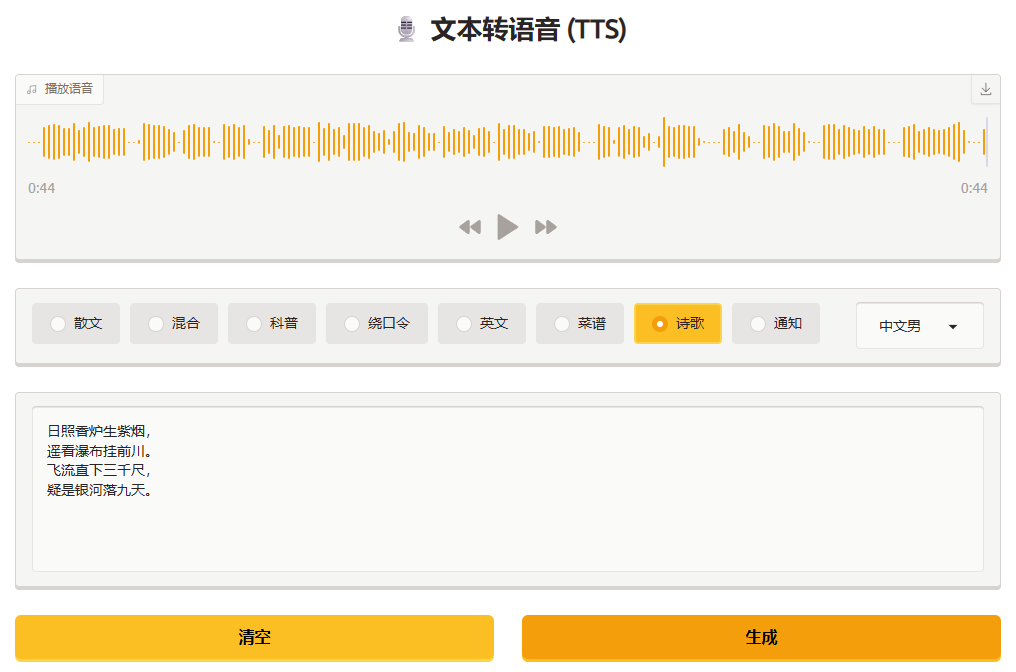
2.2 客户端
为了让 TTS 模型的使用更直观、无需编写代码就能操作,我们可以借助 Gradio 工具。它是一款轻量级 Python 可视化工具,核心作用是快速搭建机器学习应用的 Web 交互式界面,无需掌握复杂前端开发技术,仅需少量 Python 代码,就能生成包含文本输入框、音色选择器、语音播放器的客户端界面,既能方便自己调试模型,也能让非技术人员轻松使用,是快速演示和落地 TTS 模型功能的优选工具。
conda create -n gradio-env python=3.10
conda activate gradio-env
pip install gradio numpy soundfile requests
import warnings
warnings.filterwarnings('ignore')

import gradio as gr
import requests
import soundfile as sf
import numpy as np
import glob
from pathlib import Path
import json


default, sample_rate = sf.read('audio/default.wav', dtype=np.float32)

def generate_audio(txt, spk):
    try:
        response = requests.post('http://192.168.5.20:8000/tts', data={'txt': txt, 'spk': spk}, timeout=60, stream=True)
        response.raise_for_status()
        audio_bytes = bytearray()
        for bytes in response.iter_content(chunk_size=4096):
            audio_bytes.extend(bytes)
        audio = np.frombuffer(audio_bytes, dtype=np.float32)
        return (24000, audio)
    except requests.RequestException:
        return (sample_rate, default)


def page_load():
    try:
        response = requests.get('http://192.168.5.20:8000/spk', timeout=10)
        response.raise_for_status()
        speakers = json.loads(response.content)  # 转换为列表对象
        choices = [(speaker['name'], speaker['sid']) for speaker in speakers]
        return gr.update(choices=choices, value=choices[0][1])
    except requests.RequestException:
        return gr.update(choices=[('网络错误', 'error')], value='error')


# 加载示例文本
samples = { Path(fname).stem: open(fname, 'r', encoding='utf8').read() for fname in glob.glob('example/*.txt')}

with gr.Blocks(title='TTS 语音合成') as app:
    gr.Markdown('<center><h1> 🎙️ 文本转语音 (TTS)</h1></center>')
    audio = gr.Audio(label='播放语音', type='numpy', buttons=['download', ], autoplay=True)

    with gr.Row():
        radio = gr.Radio(choices=samples.keys(), show_label=False, interactive=True, scale=9)
        speak = gr.Dropdown(show_label=False, scale=1)

    inputs = gr.TextArea(show_label=False)

    with gr.Row():
        clear = gr.Button('清空', variant='secondary')
        submit = gr.Button('生成', variant='primary')

    # 绑定事件
    disable = lambda: gr.update(interactive=False)
    enable = lambda: gr.update(interactive=True)
    submit.click(fn=disable, outputs=submit).then(fn=generate_audio, inputs=[inputs, speak], outputs=audio).then(fn=enable, outputs=submit)

    clear.click(fn=lambda : '', outputs=inputs)
    radio.change(fn=lambda title: samples.get(title, ''), inputs=radio, outputs=inputs)

    app.load(fn=page_load, outputs=speak)

if __name__ == '__main__':
    css = '''
         .gradio-container {width: 1050px;margin: 0 auto;background-color:white;}
         .control-wrapper{display:none;}
     '''
    app.launch(theme=gr.themes.Citrus(), css=css)

 冀公网安备13050302001966号